3 minutes
Bell Home Hub 4000 PPPoE Passthrough on OPNSense
My favorite protocol that sounds like it has a stutter is on the menu for today’s post. We’ll be discussing my migration from using the Bell Home Hub 4000 (HH4K) in Advanced DMZ mode to expose my OPNSense VM to the internet, to using PPPoE passthrough instead.
TL;DR
1. Get your PPPoE credentials.
2. Plug your router into one of the HH4K ports.
3. Create a PPPoE device interface and enter your credentials.
4. Assign PPPoE device interface as your WAN.
Get your PPPoE credentials
There are two places to get your PPPoE credentials:
1. The HH4K box or a Bell technician: Allegedly, the credentials come with the HH4K, but your Bell tech can provide them as well.
2. Bell account website: Log in to your Bell account, explore your services, and if Internet isn’t immediately visible, click View All Services.
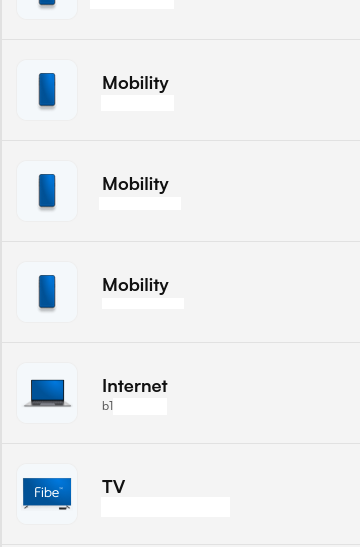
Under the “Internet” label, note the number displayed. This is your PPPoE username (usually in the form b1******).
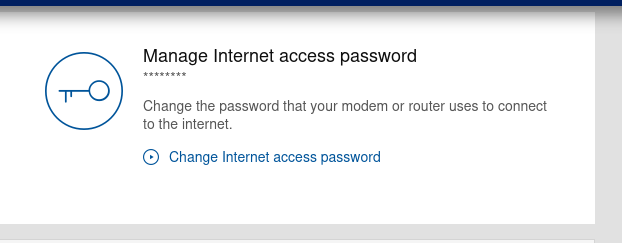
Click Internet to go to your internet plan overview. Scroll to “Manage Internet access password” to set your PPPoE password.
Physically connect OPNSense to HH4K
Simply plug your OPNSense router into the HH4K.
For those who like network lingo: ensure both devices are in the same broadcast domain. If that makes sense to you, you know what to do.
Create PPPoE device interface
On OPNSense, go to Interfaces > Devices > Point-to-Point and click the plus button to create a new device.
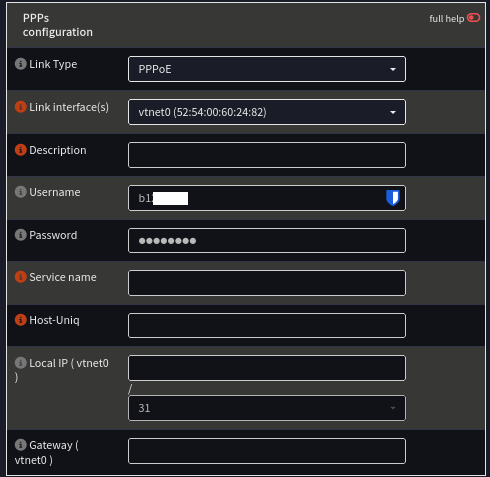
Link Type: PPPoE
Link Interface: HH4K Facing Interface
You should already know which NIC points toward the HH4K. Under “Link Interfaces,” select that interface, enter your credentials, and hit save.
Assign PPPoE device interface as WAN
Go to Interfaces > Assignments, select the dropdown for WAN, and choose the PPPoE device you just created. Save your changes and wait for the interface to connect.
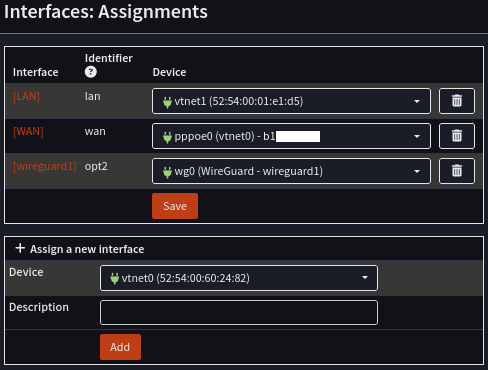
Important: Make sure you enable the WAN interface if it is not already enabled.
Troubleshooting
Check System > Log Files > General for PPPoE-related logs. Error messages like “Connection timed out” or “Invalid credentials” are usually self-explanatory.
You can also reload the PPPoE interface from Interfaces > Overview to renegotiate the connection with Bell. This can clear stale data that might cause strange behavior.
Misconceptions
Using PPPoE will brick the HH4Ks other functions
Some believe that using PPPoE credentials would prevent the HH4K from performing other functions.
For the HH4K, this is not an issue. Both networks can run side by side without interrupting internet, phone, or TV service.
On other devices, only one PPPoE session per credential is allowed. The HH4K authenticates at a lower layer using its ONT serial, vendor ID, and optical parameters, so PPPoE is simply a bypass that allows custom hardware to authenticate with Bell.
VLAN tagging necessary on HH4K ports
I initially thought VLAN tagging was required for PPPoE on the HH4K. It’s not. Simply being in the same broadcast domain is sufficient.
VLAN tagging is only required if bypassing the HH4K entirely, for example when using an SFP module to connect directly to Bell’s fiber (VLAN 35 is used for internet traffic in that scenario).
PPPoE would decimate my internet speed
Not necessarily. On a Raspberry Pi, maybe. On a VM running on a powerful server, you’ll likely reach advertised speeds. My 4-core VM never exceeds 40% CPU utilization while hitting full speed.
References
homelab OPNSense networking cisco isp pppoe
558 Words
2026-01-10 00:00 (Last updated: 2026-05-02 05:26)
2f80c01 @ 2026-05-02