10 minutes
Website Deployment via Gitea Actions
As you might have guessed.
I made this site using Hugo.
But you didn’t expect me to take the easy way of deploying it, did you? This had to be a bloggable opportunity. I needed to learn something. I had to cry over it for at least an hour before it was deemed worthy for my blog.
So, I guess this calls for:
DEVOPS
Which means DEVOPS TOOLS.
With which, things can be OVER ENGINEERED.
Because that’s just what the cool guys do.
The Tools
To complete this project we need to deploy virtual machines, configure them, and have Gitea workflows deploy our Hugo site to our new VMs upon push to master. Let’s see who’s on the roster for tonight.
- OpenTofu
- Ansible
- Gitea (Actions)
- Docker registry
- Cloudflared
Infra Involved
This is as close to ‘basic’ as it gets as far as GitOps is concerned. A VM deployed via an infrastructure as code tool, source code management platform, CI/CD pipeline, and a machine the pipeline outputs to.
OpenTofu -> Blog
Ansible -> Blog (Initial Configuration)
Git repo changes -> Gitea -> Gitea Actions -> Blog VM
Blog
This virtual machine will be deployed and configured via devops tools. It’ll run Ubuntu server and have Docker installed. The rest will be explained below.
Gitea
This is my Gitea instance, as the name suggests. It launches the actions, much like GitHub does. In fact, it is in most cases compatible with any GitHub Actions script you throw at it. You can read a brief blurb about it in my services post here.
gh-actions
This is my runner VM, as detailed here, is an Ubuntu VM acting as a GitHub and Gitea runner for all my various github/gitea actions.
Docker Registry
The docker registry used in this project is similarly a locally hosted service on my server. It holds the images my gitea actions pipeline creates and distributes them when queried.
version: "3.8"
services:
  registry:
    restart: unless-stopped
    image: registry
    volumes:
      - ./data:/var/lib/registry:rw
    labels:
      - traefik.enable=true
      - traefik.http.routers.registry.rule=Host(`registry.cball5.club`)
      - traefik.http.routers.registry.entrypoints=websecure
      - traefik.docker.network=gateway
      - traefik.http.services.registry.loadbalancer.server.port=5000
    networks:
      - gateway
networks:
  gateway:
    external: true
This is a pretty barebones compose file. That’s the beauty of the registry. It’s one of those set and forget services provided you do it properly. I’ve got it configured to use https://registry.cball5.club. Putting it behind my load balancer means that docker won’t complain about it being over an insecure connection. It’s also much more pleasent to type out.
Deployment
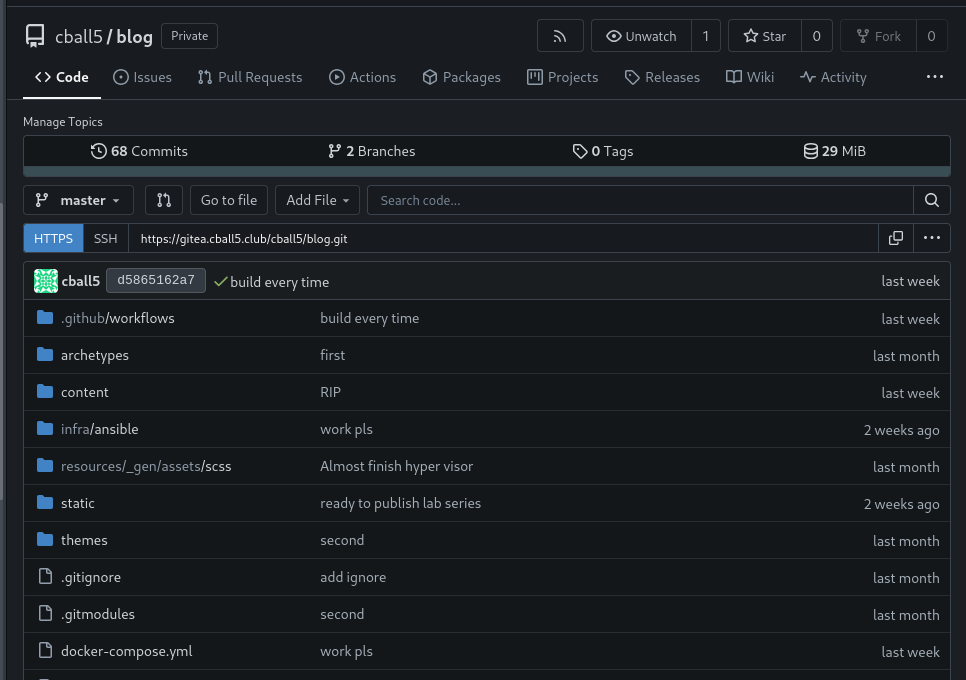
Ignoring the git commit messages, this is my Gitea repo for the blog. There’s not much to it. It’s your typical Hugo project.
Where it diverges from the bog-standard setup is that I have dockerized it and integrated it into Traefik.
Blog VM
The blog VM is deployed by means of OpenTofu. OpenTofu is my only desired flavor of tofu. You can keep the rest for yourself. Terraform, while handy, is not open source. So OpenTofu it is.
There exists a provider for Terraform that is cross-compatible with OpenTofu. You can read the docs here:
Github: dmacvicar/terraform-provider-libvirt.
Now, this isn’t the most mainstream of providers, but it worked for me. Take a look at the initial provider declaration.
provider "libvirt" {
  uri = "qemu+ssh://[email protected]/system"
}
What you’ll notice is that it is the same URL you’d use if you were to access a remote machine on virt-manager over SSH. That’s because that’s exactly what’s happening. Just as virt-manager is a wrapper over virsh, so too is this provider, with some bells and whistles attached.
resource "libvirt_volume" "ubuntu-qcow2" {
  name   = "ubuntu-qcow2"
  pool   = libvirt_pool.ubuntu.name
  source = "https://cloud-images.ubuntu.com/releases/24.10/release/ubuntu-24.10-server-cloudimg-amd64.img"
  format = "qcow2"
}
The image that is to be downloaded and deployed as the cloud image is specified like shown above. This is simple enough and makes it easy to change operating systems by simply changing the URL.
With all that in mind, a tofu apply sets this all into motion, and the machine deploys to my server. Once it is live, it’ll start checking for a cloud-init disk. This drastically reduces the amount of manual intervention, if any, I would need to do in the deployment of this infrastructure.
data "template_file" "user_data" {
  template = file("${path.module}/cloud_init.cfg")
}

data "template_file" "network_config" {
  template = file("${path.module}/network_config.cfg")
}

resource "libvirt_cloudinit_disk" "commoninit" {
  name           = "commoninit.iso"
  user_data      = data.template_file.user_data.rendered
  network_config = data.template_file.network_config.rendered
  pool           = libvirt_pool.ubuntu.name
}
#cloud-config

users:
  - name: cball5
    gecos: cball5
    sudo: ALL=(ALL) NOPASSWD:ALL
    shell: /bin/bash
    groups:
      - sudo
    ssh-authorized-keys:
      - ssh-rsa #REDACTED#

  - name: root
    ssh-authorized-keys:
      - ssh-rsa #REDACTED#
chpasswd:
  list: |
    cball5:#REDACTED#
  expire: false
packages:
  - openssh-server
growpart:
  mode: auto
  devices: ['/']
The wonderful part about cloud-init is you can specify all sorts of useful things like SSH keys, IP addresses, user accounts, and so much more. I once had the entire configuration of the VM done through the cloud-init. It was not pretty, and I do not recommend it. Ansible is a much better option, as I’ll be showing you below. I’m not going to subject you to the entire thing, though. I’ll just put a link to that at the end.
Ansible Setup
---
- name: Set up Docker, clone repo, and install packages
  hosts: blogmachine
  tasks:

# Comments like the one below denote ommitted steps, for brevity sake.
#--- Install Docker repo ---

    - name: Install Docker
      become: yes
      apt:
        name: docker-ce
        state: present
      when: ansible_os_family == "Debian"

    - name: Ensure Docker service is running
      become: yes
      service:
        name: docker
        state: started
        enabled: yes
      when: ansible_os_family == "Debian"

#--- Install some packages---

    - name: Clone the Git repository
      git:
        repo: 'ssh://[email protected]:222/cball5/blog.git'
        dest: '/home/cball5/blog'
        version: master
        force: yes
        ssh_opts: '-o StrictHostKeyChecking=no'

    - name: Add user to Docker group if not already present
      become: yes
      user:
        name: "cball5"
        group: docker
        append: yes
      when: "'docker' not in user_groups.stdout"

    - name: Reboot the system if the user was added to the Docker group
      become: yes
      reboot:
        reboot_timeout: 600
        test_command: whoami
      when: "'docker' not in user_groups.stdout"
It’s quite simple really. Install Docker and clone the repo. Ansible makes this as simple as configuring the hosts, and running the playbook.
Gitea Actions
Once the blog machine is up and running. It is then necessary to have an automated means of pushing updated code to the machine to be executed.
on:
  push:
    branches:
      - master  # Trigger this action on pushes to the `master` branch.

jobs:
  deploy:
    runs-on: ubuntu-latest

    steps:
    - name: Checkout Code
      uses: actions/checkout@v3

    - name: Build Docker Image
      run: |
        docker build -t registry.cball5.club/blog:latest .

    - name: Push Docker Image
      run: |
        docker push registry.cball5.club/blog:latest


    - name: Set up SSH agent
      uses: webfactory/[email protected]
      with:
        ssh-private-key: ${{ secrets.SSH_PRIVATE_KEY }}

    # Step 2: Test SSH Connection (optional but good for debugging)
    - name: Test SSH Connection
      run: |
        ssh -o StrictHostKeyChecking=no [email protected] "echo SSH connection established."

    # Step 3: Execute commands on the remote server
    - name: Deploy
      run: |
        ssh -o StrictHostKeyChecking=no [email protected] bash -c "
          cd /home/cball5/blog && \
          docker compose down && \
          git fetch origin && \
          git reset --hard origin/master && \
          sed -i 's/{{SECRET_PLACEHOLDER}}/${{ secrets.DOCKER_SECRET }}/g' /home/cball5/blog/docker-compose.yml
          docker compose pull && \
          docker compose up -d --force-recreate
        "
      env:
        DOCKER_SECRET: ${{ secrets.DOCKER_SECRET }
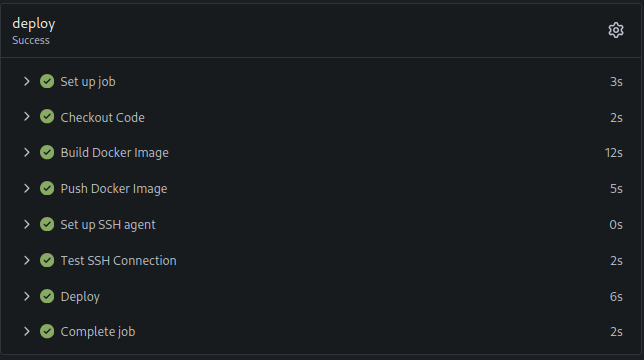
While this may seem daunting at first glance, it’s really just the building of the container, the pushing of it to the registry, and the deployment of that new image to the remote machine. See the image below where the image is pushed to the registry after a successful build.

Note step 3, It’s worth taking a look at. See how it replaces a specific secret placeholder as it’s placed on the machine. This is useful, especially for secrets that you need to have locally. Sadly, docker-compose does not provide a secrets function outside of swarm mode. I am not using it though, so some jank is necessary. You’ll need to set the secrets as shown below in the repo settings.

Details of note
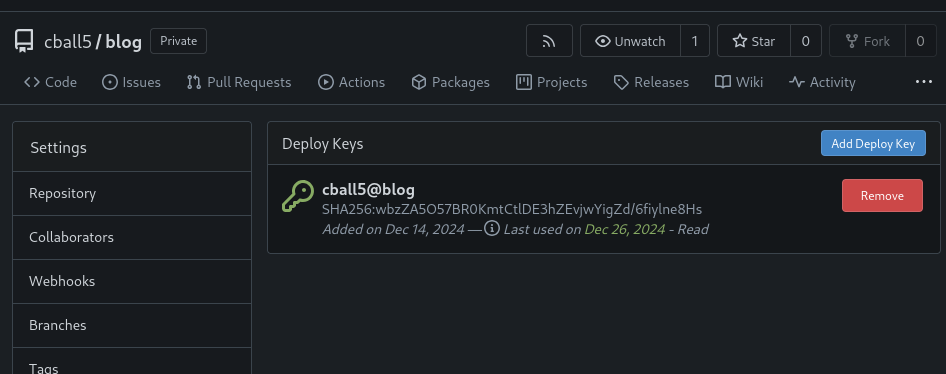
To make this work, you’ll either have to make the repo public or add a Deploy Key, so that your blog machine will have read access to the repo. This means that your machine will need to have an SSH key. Your machine will automatically generate one, but that means you’ll have to go retrieve it and submit it to the Gitea repo. This is one of the few manual steps to be done.
Cloudflared
Cloudflared (verb, past tense)
The process of losing internet connection when initially connecting to the cloudflare VPN.
Example usage:
I cloudflared so hard, I thought my internet died.
Stolen from Urban Dictionary.
Now that I’ve got that out of my system. Cloudflare and their tunneling service are a super useful way for an individual to host public-facing services while protecting one’s WAN from DDoS and other things.
I’ve used Cloudflare and their various zero trust services in the past, and they performed well. There’s a song and dance to get things set up, but following tutorials like this one will get you set up nicely. Using the docker container version is more or less the same process as in the tutorial, except that you supply the key in the env variables or insert it as a secret as I do here.
Watch out for this

Cloudflare by default will generate and use its own SSL certificate to place between your service and clients. I didn’t like this and disabled it in the past and opted to passthrough my load balancer with SSL termination. A year or two later I come back and try to deploy this blog. Sure enough, I’m scratching my head wondering why my site is http only. After much consternation and fiddling with Traefik, I found this setting. Flipped it over to flexible, and it started working.
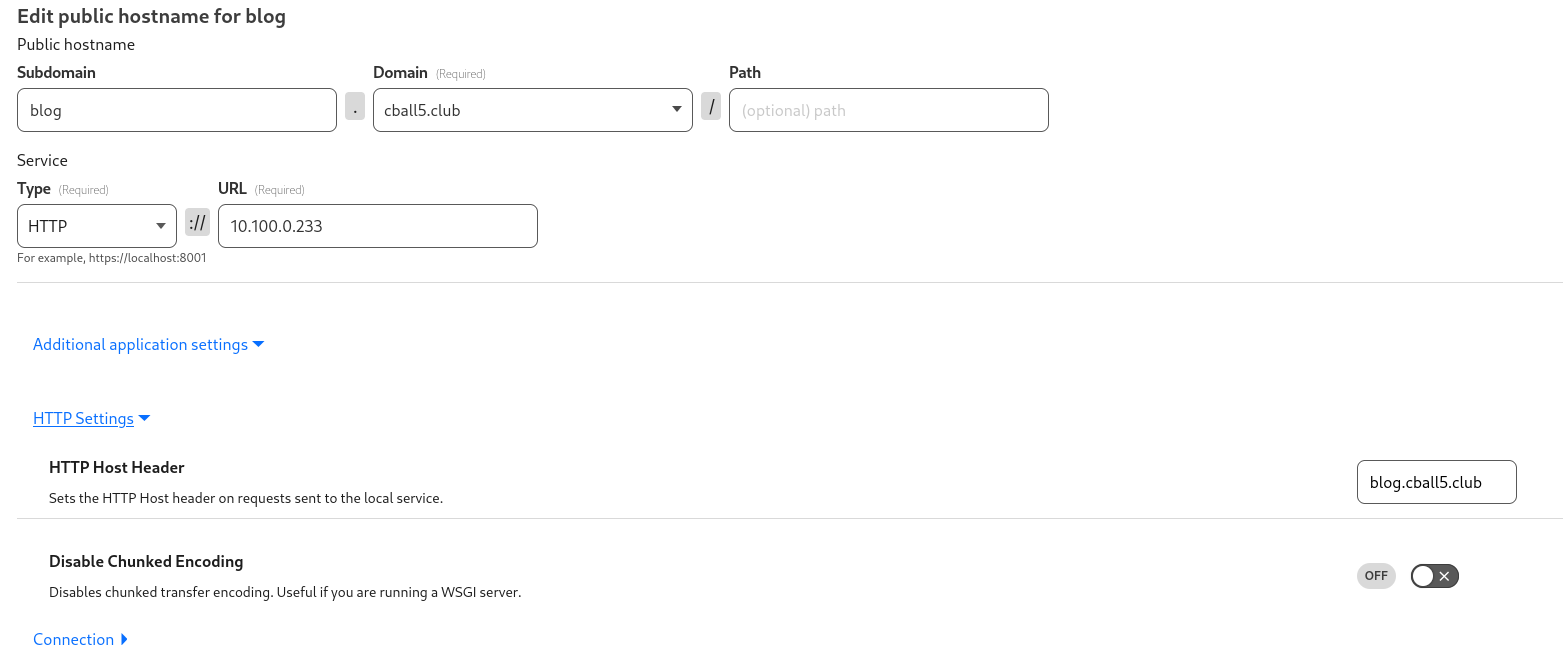
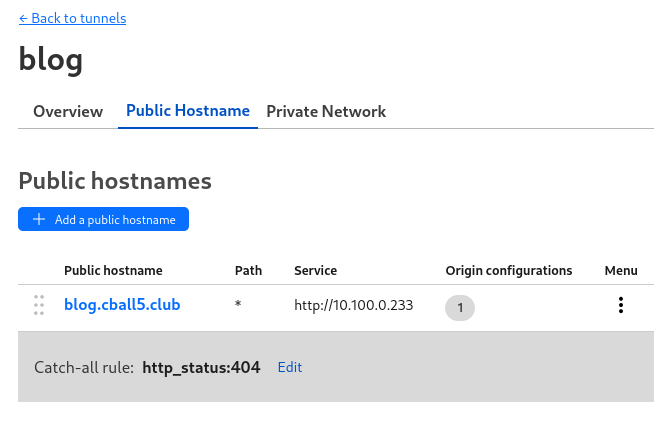
One more thing: when dealing with smart load balancers like Traefik, you must make sure the host header setting on the tunnel is enabled and set to the domain your load balancer is expecting. As is in this case, blog.cball5.club. Otherwise, the host header is randomly generated numbers and the name of the container.
Docker
Dockerfile:
FROM hugomods/hugo:exts as builder
ARG HUGO_BASEURL=
ENV HUGO_BASEURL=${HUGO_BASEURL}
COPY . /src
WORKDIR /src
RUN git submodule update --init --recursive
RUN hugo --minify --enableGitInfo
FROM hugomods/hugo:nginx
COPY --from=builder /src/public /site
Docker Compose:
version: '3.8'
services:
  web:
    restart: unless-stopped
    image: registry.cball5.club/blog:latest
    labels:
      - "traefik.enable=true"
      - "traefik.http.routers.web.rule=Host(`blog.cball5.club`)"
      - "traefik.http.routers.web.entrypoints=web"
      - "traefik.http.services.web.loadbalancer.server.port=80"
    environment:
      - HUGO_BASEURL=https://blog.cball5.club
    networks:
      - web

  traefik:
    image: traefik:v3.2.2
    container_name: traefik
    restart: unless-stopped
    command:
      - "--api.insecure=false"
      - "--entrypoints.web.address=:80"
      - "--providers.docker=true"
    ports:
      - "80:80"
      - "443:443"
    volumes:
      - "./traefik:/etc/traefik"
      - "/var/run/docker.sock:/var/run/docker.sock"
    networks:
      - web
    depends_on:
      - web

  cloudflared:
    image: cloudflare/cloudflared:latest
    container_name: cloudflared
    restart: unless-stopped
    command: tunnel run
    volumes:
      - ./cloudflared:/etc/cloudflared
    environment:
      - TUNNEL_TOKEN={{SECRET_PLACEHOLDER}}
    networks:
      - web
networks:
  web: {}
This compose file is what gets executed by the blog VM and how you’re viewing this site. web pulls the image from the registry and runs it. Traefik sits in the middle for when I need more flexibility. This will include SSL termination and hosting multiple sites as different paths.
The general structure from the inside looking out is:
web -> traefik -> cloudflared
But Corey, isn’t Traefik redundant?
Yes, in this case it is. But I’m going somewhere with this. You see, Cloudflare is everybody’s favorite Man in the Middle (MITM) platform. For free, you can do all sorts of things like manage your DNS or pipe your self-hosted services up through the cloud to protect your WAN address. Sounds cool, right? Sure. Until you think about the privacy implications. Cloudflare sees all of the traffic going to your site, and it sees all of the metadata of the traffic going to your site. Surely we’ve learned by now that everything that can be collected and sold/given to the feds, IS.
So what’s this got to do with Traefik?
I was trying to use my own SSL certificate via ACME. But in the end, I decided that there simply wasn’t anything worth encrypting. If I were to be privacy conscious with this site, I would simply not be using Cloudflare. The traffic data that is useful to an actor in this scenario is more concerned about the metadata, not repeats of the same blog pages.
Can I have a copy of those files?
Sure, here you go.
Tofu Files
Ansible Files
Gitea Actions
Docker Files
homelab blog opentofu server ansible hugo cloudflared Cloudflare Tunnel
2046 Words
2024-12-14 06:29 (Last updated: 2026-05-02 05:26)
2f80c01 @ 2026-05-02